Installing Thread Inserts
Recently, in spite of using a torque wrench, I managed to strip the threads in one of the nine 6mm bolt-holes holding down the clutch cover on my motorcycle. I decided to fix it myself with a thread insert kit. This was the first time for me to attempt such an operation. Here is how it went.
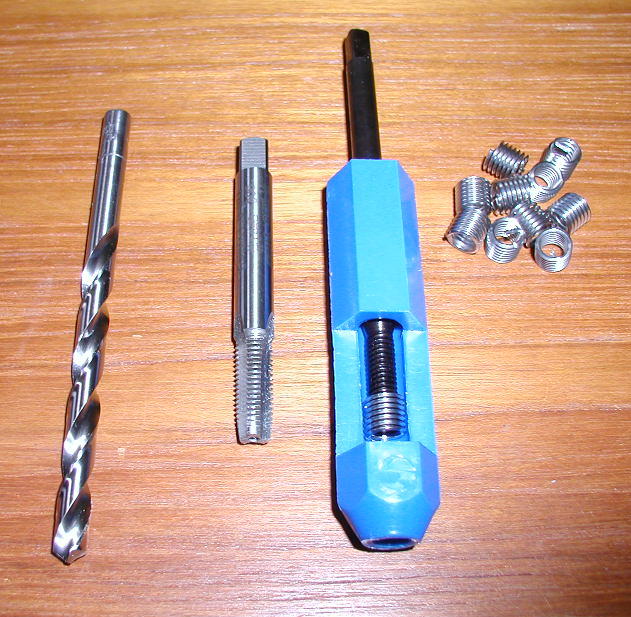
|
| Perma-Coil blue plastic pre-winder and insertion tool with an insert mounted on it. The kit includes the tap and a dozen inserts but does not include the drill bit. |
The basic idea is to drill out the stripped threads, cut threads for a stainless steel thread insert that replicates the old threads and screw in the insert. I located a Perma-Coil Kit of the right size, M6 x 1.0, a very common fastener on Japanese motorcycles.
HeliCoil Thread Insert Kits are "the name" in thread inserts. The Perma-Coil Kit I used is self-billed as "The other name in thread repair".
The Perma-Coil kit required a 1/4-inch drill and I also sprung for a 1/4 - 1/2-inch T-Handle Tap Wrench. An adjustable spanner might have worked but this was one job I did not want to ruin. All together, I was down for about $30.
Drilling out the old threads
It is very nerve-wracking to drill a hole in your motorcycle engine. The most important thing was not to drill too far. It was a blind hole, one you cannot see all the way through, with who knows what on the other side. A broken Q-tip came in handy for measuring the existing depth of the hole, a measure that I transferred to the drill bit and marked off with a wrap of tape so that I would not drill too deeply.
The sharp, new bit easily and quickly cleaned up what was left of the old threads and the existing bolt-hole helped guide the bit. Later, it occurred to me that I could have used the T-handle to drill the hole by hand and it probably would have given me more control and been safer. My garage has no compressed air, but a few blasts through a soda straw cleared the chips out of the hole. Another Q-tip confirmed it was cleaned out and prepared the way for the next step.
Cutting new threads for the insert
The T-handle chucked up to the tap securely but the initial few turns in the bolt-hole made my stomach queasy until I felt it get a purchase and start carving out little chips of aluminum. Again, the existing hole helped guide the tool which turned easily in the soft aluminum until it reached the bottom. Carefully backing out the tap, a few more blasts of air cleared out the remaining chips in the bolt-hole. Next came the moment of truth.
Inserting the coil
This size kit included a pre-winder and the inserts had a tang on one end. Place an insert in the pre-winder, tang down. Insert the installation tool into the pre-winder. The tool turns the insert by means of the tang through threads in the pre-winder. Hold the pre-winder against the bolt-hole and continue turning. The insert screws from the pre-winder into the new cut threads, requiring a leap of faith. Continue turning until the insert is below flush a quarter to half a turn. Smartly strike a punch or drift to knock off the tang. Remove the broken tang from the bolt-hole. A magnet with a piece of wire on it neatly sucked up the loose stainless steel tang and retrieved it from the hole.
The thrill of victory
The case buttoned up and torqued down without further difficulty. The bolt-hole with the stainless steel insert is most likely much stronger than its eight neighbors. I am very pleased with the results.
